
Gardeners: How To Take Great Plant Photos
Learning to photograph plants and flowers well is a great skill. It is an art form of its own that helps you to preserve a favorite time of your favorite plants. It can also be a great way to track continuing growth and the development of special specimens over the years.
Here we will go over the basics of composition, the use of lighting, using the concept of depth of field, appreciating patterns and textures, and the art of staging. Sample photos will be used to illustrate specific points.
How do you compose a picture so the elements interact in a way that is pleasing to the eye? Try these suggestions.
Focal Point and the Rule of Thirds
Focal point is the part of composition that catches your eye and/or leads your eye to the dominant image. Focal point is a matter of personal preference but generally the best look is generated using the Rule of Thirds. Imagine overlaying a grid that divides the picture into three sections vertically and three sections horizontally. See the sample photo below.
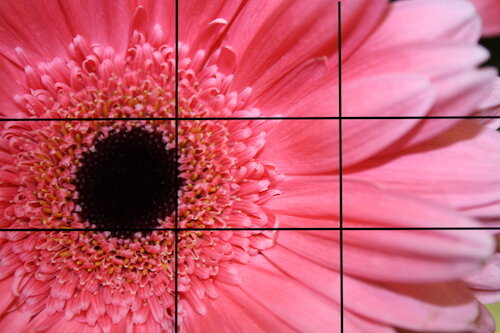
The focal point in this picture is the LEFT THIRD of the picture. Although it might seem off balance, it is still aesthetically pleasing. Pick a spot for your focal point that is either top or bottom left, or in the right third of the photo. There is an exception – near perfect symmetry in a composition - this is most pleasing to the eye.

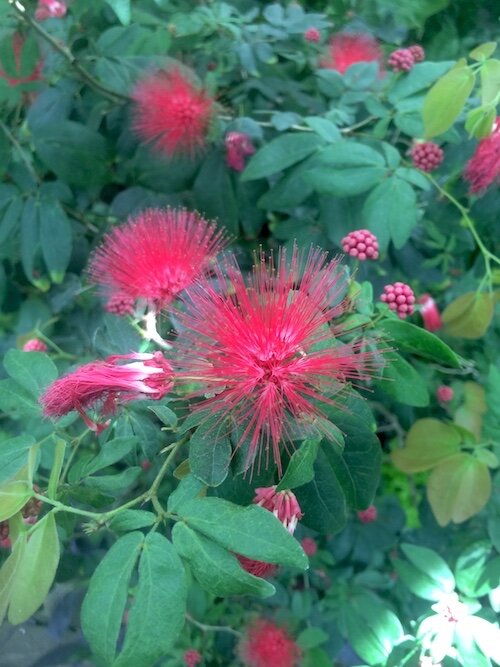
An offshoot of the Rule of Thirds is that things just look better in odd numbered groupings. When there is an even number of objects, the eye tends to try to balance them. But in a group of 3, 5, 7, etc., the objects create a line for eye movement that ties them together. This orchid just happened to have three nice clusters of flowers and the eye is drawn to move between them. Note that the top left cluster and the rightmost cluster land at points that actually follow the Rule of Thirds.

Patterns & Textures
Patterns and textures are a great way to add interest or definition to a photo. Nature is just full of amazing patterns and textures. Use composition to emphasize natural textures and patterns. For example: a smooth leaved succulent may look really good up against a textured backdrop like a brick wall. Or, the stripes of Hawthoria may stand out more if you use a smooth backdrop. This silk flower provides its own contrasting texture with its leaves helping the flowers stand out to the eye.
Taking the Picture
Technically the depth of field is part of composition but it deserves more of your attention and has to be decided when you are ready to take the picture. It is basically how deep into the picture things are focused. You can apply the depth of field concept to either include the background elements or exclude them to a certain extent. For example, the picture below has a short depth of field and it allows the focus to be on the cool seedpod in the foreground rather than all the things in the background.

Note that depending upon the type of equipment you are using (DSLR camera vs. Smartphone) you may have variable control over the depth of field. If possible, experiment with different depths of field to better understand how to use the concept when photographing your plants.

Always, always LIGHTING IS KEY! Light from different angles can completely change the look of the plant you are photographing. When the plant has backlighting it tends to look more shadowy. This can be used to highlight structure rather than color or other details. If the plant is lit from the front, you will see all the details on it. Frontal lighting (where the camera is) not only highlights the subject but also influences the focal point of the image.
Staging
Staging is the art of physically setting up the elements of a photo to get the best composition. If you are doing photos of a collection of plants, you can probably move the pots around to achieve the best composition. However, if the plant is stationary, you can sometimes manipulate other things around it. A little staging goes a long way and having some garden-themed props (trowels, pots, watering cans) can liven up your plant photos. The bromeliad photo above is from a special planting at a conservatory and is about as staged as it gets. Every element has been placed specifically to be viewed from this angle.
Practice makes perfect
Getting great photos and learning to take better photos comes from trying different angles and finding your own style. This guide gives you the basics and points you in the right direction. Don’t get discouraged or overwhelmed. You may get a lot of “sub-par” photos at first, but keep trying. Practice really does make perfect.
Thank you for reading. Please be sure to browse the shelving frames I have designed and support a Made in the USA Product.
~ Shirley Designer & Founder of Shirley's Simple Shelving